Showing posts with label advice. Show all posts

Sunday, 4 September 2016

Dealing With Writer's Block


I'm writing this after looking at a blank page for an hour, I have literally just been sat for an hour going through blog post ideas, writing and rewriting so many different titles onto a blank draft. Every time I go to write the body of the post my hands hover over the keyboard waiting for inspiration to hit me and words to flow out and so far, they haven't.

So, I guess a streak of inspiration finally hit me as I realised what better time to write a post about writers block than when I have it!
a. It will be fresh on my mind and hopefully the post will be publish-worthy
and/or
b. it may bring me out of my writer's block rut and encourage me to write more posts

Personally, as a blogger there is nothing worse than having all these post ideas written down and not being able to produce them, it's frustrating but also really stressful because I like being ahead on posts and as ideas come to me I get excited knowing I can do that but my lack of motivation and inspiration to write stops me.

With that being said, here are my top 10 tips for getting over or coping with writer's block! (surprise surprise, in a list)

1. Take a break! Walk away and don't do what I did by sitting in front of a screen waiting for the words to come to you. It will happen when it's right.

2. Chat to blogger friends, see if they've got any ideas or if they've seen any great blog posts recently that might suit your style. Blogger friends are the best form of all things blogging related: the information, ideas and feedback you will get from them is far more personal, reliable and brutally honest than any twitter poll or comment section you will find.

3. Always always always write ideas down! I love doing this; anytime a blog idea, title, question, theme or anything at all comes to me, I write it down. Even if they're just messy notes on a receipt or ticket etc. from something you've done or seen/heard/ate/bought, if you look back in your notes you will find some form of inspiration to kick start your writing again.

4. Scroll through Pinterest! Even if its pictures of puppies, curtains, tattoos, wedding invites or DIY furniture it will get your creative juices flowing and before you know it something will come to you and away you'll go writing until your hands ache.

5. Read through the blogs you follow and catch up on those you've missed. On Bloglovin, something I always do whenever I really relate to or show interest in a post is like it, it may be because I plan to write a post similar in the future - following along the same lines but using my own experience - or just to save to read later because the title caught my eye! This may bring old ideas back or even kick start fresh, new ideas.

7. Speak to a real life person. Sometimes I find staring at a computer screen really makes me shut down. My typing slows and I become tired, hence lack of motivation to continue. Recently however whenever this has happened I've gotten up out of my seat; walked, stretched and can you believe it, spoken to an actual human being instead of typing my thoughts into an unresponsive draft post!

8. Drink water. This isn't just for when you hit the writer's wall, you should always have a very large bottle or glass of water by you whilst writing, I find it gives my hands a break, refreshes me and of course prevents me from having headaches, getting tired or feeling irritable.

9. Listen to music! My all time favourite way to listen to music for a source of inspiration always used to be to go onto 8tracks and find a great playlist, however since 8tracks has limited its services I can no longer use it effectively and so have turned to Spotify. Now, I never really rated Spotify (don't get me wrong the music, playlists and usability is great) but due to the ads and the fact I refused to pay for premium, the likability factor was never really there for me. However, after using it for several months I've realised the ads are hardly noticeable when you're on a good playlist and you're too deep into writing to even notice so NO I still haven't gone premium...

10. Now last but by no means least, STOP. You don't need to write this post right now, your life does not depend on it. For me personally I never have and probably never will have a strict post schedule to stick to. I don't have millions of followers waiting for the clock to hit 5pm to refresh my blog. I do this for me, writing is something I enjoy and stressing myself out is something I don't enjoy, so I try where possible to keep the two separate. If I feel my blog is stressing me out, I stop. I think a lot of bloggers put pressure on themselves to perform. I can completely understand if you're working with a brand and have a deadline you may worry when it comes to finalising posts or if your main source of income is from your blog it may become a worry; but for most of us this is a hobby, our thing on the side of our everyday lives and regular jobs, so post when you can, when you feel ready and happy with your content, you don't owe anyone anything.  

Now, after writing this list I'm feeling motivated, inspired and ready to write posts until my eyes glaze over and feel heavy! Who thought writing a post about writer's block would cure writer's block? I'm a big fan of irony.

Do you struggle with writer's block? What are your tips to help?

Until next time, Toni. xo

Wednesday, 17 August 2016

Mac's Vanilla Pigment


Pigments don't get enough attention, it's all about pressed powders and creams at the moment but I cant help but love loose pigment. Mac's Vanilla Pigment is no exception to this love affair, this comes in as my no.1 favourite and in the summer is undoubtedly on my face everyday.

I tend to use this as a highlighter and trust me you DO NOT need a lot! A tiny spot of this on your cheek bone with a highlighter brush to blend and you are set to blind people all day long with the glow you'll be sporting. This is also absolutely unbeatable for highlighting on the cupids bow on your lip and tip of your nose, listen to me when I say you only need a TINY bit - this is a pigment and therefore clearly very pigmented, it goes a long way and this tiny tub will last you yonks!

Another use for this pigment is the inside corners of your eyes to brighten up any make up look. I especially love using this on a smokey darker look as this tiny pop in the corner opens up your eye so much. Alternatively, for festivals, concerts etc. you could really go to town with this pigment using it boldly on your eyes as well as a highlight to fully open up and brighten your face.

To apply this pigment I use the mac 228 brush. I actually have two of these brushes as I use one for the eyes and another to apply the highlight to make sure I don't get a random smokey contour transfer from my eye! Obviously I then blend with bigger brushes and add more when necessary but like I said with this pigment less is definitely more!

Do you use pigment? What do you use it for? What's your all time favourite one?

Until next time, Toni. xo


Monday, 15 August 2016

Learning to Drive: Theory Test!


Learning to drive is one of the best, most important, stressful, exciting and expensive lessons of your life and most people can't wait to start but I delayed starting to learn to drive for way too long after I received my provisional licence.

I'm now very close to being able to take my practical test (according to my driving instructor) so a few weeks back I got myself into gear - excuse the pun- and started learning the highway code, laws and rules of the road ready to take my theory test. I booked my test and arrived at the test centre a bundle of nerves, confidence, excitement and dread but after a very speedy 30 minute test passed with 49/50 on the questions and 63/75 on hazard perception. Obviously I was very happy to have passed and not needing to worry about the endless highway code again was a big relief but most of all I was just glad I didn't have to pay again to re-sit the test! Like I said this learning to drive stuff can become very expensive and saving money where possible is a total bonus. I thought I would share the methods I used for learning and passing the test in order to help any fellow learners out and hopefully save you some time and money in the long run!

1. Revise! There is A LOT to learn and you don't want to leave it until a week before to start learning everything you will need to know in order to pass. Do little bits at a time and don't sit in front of a book, computer or app for hours on end because you will become incredibly bored and nothing will stick! I tried to do at least one topic everyday and then when I had completed them all went over them again and again. When completing a topic make sure to look at the case studies and look at and familiarise yourself with your incorrect answers for next time.

2. When you're in a car or walking or near a road look up from your phone or just try and pay more attention to your surroundings, you will be amazed by how much you will notice and learn just from looking. Try and remember the placement of different signs and what they are near that way you will understand further what they mean. The same rule applies for road markings, look out the window or ahead on the road and notice the size, colour, shape and placement of lines and how vehicles respond to them.

3. Ask questions to literally everyone - taxi drivers, bus drivers, family, your driving instructor or even google! If you see something you're not sure of or not familiar with -ask! You will be amazed how many people want to show off their knowledge of the highway code (or even how many people you will catch out). I pay my driving instructor for practical driving lessons but he was always happy to answer any questions I had and even provided me with extra information I couldn't get from a book. Use your resources around you and you'll be amazed how much things sink in and start making total sense!

4. Familiarise yourself with the test- there is nothing worse than going into something not knowing what to expect, especially a test! You can read up on the format of the test or take the tests as a mock online repeatedly for free! I used an app called 'Theory Test' from the Apple App Store which was an Official DVLA certified app costing around £7.99. This turned out to be my biggest testing and learning resource as it was so practical and user friendly. It included all information, highway code manual, mock questions, case studies as well as videos for hazard perception. You could also take a full test which showed the time allowance, number of questions etc. just like the real thing. Any incorrect or unanswered questions could be revisited and progress was recorded and shown to allow you to track improvements, weak areas and uncovered topics.

5. Think positive! My friend once told me 'if you fail to prepare, prepare to fail' which is something her dad once said to her and that has always stuck with me and encouraged me to revise and prepare for everything! Therefore, when I'm prepared I cant help but feel positive about the outcome of a task and I think a positive mind leads to positive outcome as you feel more confident, relaxed and ready to face a task.


Have you taken the theory test? Are you preparing to take it? What are your top tips?

Good luck to any fellow learners!

Until next time, Toni. xo

Saturday, 13 August 2016

Black Head EX Pore Strip: Review


I will always remember the 1st time I watched the film 'Mean Girls' and I had no idea what Regina George was talking about when she said her pores were huge (I was like 8?) 


However, I have definitely felt her pain in the past few years and searched endlessly for the resolution to the problem so many people face and I'm happy to say I think I've found it - Regina you are welcome! After trying countless masks, scrubs, creams and even oils I came across a review on YouTube of these 'Black Head EX Pore Strips' and decided after seeing the results that I had to give them a go. After seeing the incredibly low price I doubted their reliability and the results they promised but bought a bunch anyway for something like £5 for 10?!

These strips come in sachets containing roughly 2 uses in each. The product is basically a black, tar-like mask that you apply in layers until thick and solid on your face. When the product is dry you pull it off slowly from the bottom upwards and literally watch your black heads and pores disappear. Admittedly the whole removal process is a bit gross and slightly eye watering but the final results are beyond worth it.

I use a strip once a week across my nose, chin, forehead and cheeks and have noticed a remarkable improvement in my skin. After a week I hardly need to use a strip but continue the weekly routine to keep my skin a good, clean condition and keep the black heads at bay.
The price, product and result are absolutely unbelievable and I could not recommend this enough. Even if you try one out for less than £1 and don't like it, at least you haven't spent hours searching around only to spend a fortune on a useless product you will probably never use again.

If only Regina could have found these answers to all her pore problems!

Until next time, Toni. xo

Thursday, 11 August 2016

Beauty Blender: Tips & Tricks


Beauty blenders are great, they've basically found themselves in everyone's make up bag in the past year or two but I cant help feel they are being mistreated and therefore underappreciated so I wanted to share some of the best things you can do to and with your beauty blender to get the best results!

1. WET IT! Please, please, please, never use your beauty blender dry- it is going to absorb the product and leave you with a streaky face which is never a great look! On the back of the pack it says use dry for a full coverage but this never worked for me- it left my face more cakey and uneven. When I wet my sponge I completely soak it, warm water first allowing the sponge to fully expand then cold ready to use! As well as providing better results, you will find it so much easier to use: it literally doubles in size, covering more of your face in a shorter amount of time and leaves the product on your face, not in the sponge.

2. WASH IT! Along with wetting it to use, it needs to washed, you are putting makeup onto it everyday and just like your make up brushes, it needs to be washed. As the sponge is getting wet it will dry with the left over product and therefore slowly become rough and not as soft as when you originally bought it. I wash mine every 3 days at least to keep it smelling and feeling fresh. I find with the wetting, washing process a sponge will last me a much longer time than if I was to use it dry. I usually buy a new one every three months but when I used it dry had to buy a new one every month! When washing your sponge use an unscented bar of soap and rub thoroughly with warm water squeezing from flat edge to tip- this will remove product and leave it the original vibrant orange colour you bought it in.

3. PAT DON'T RUB! This adorable little sponge promises big things: 'miracle complexion', 'dewy glow' and biggest of all 'covers imperfections' but the only way you will achieve this is using it how it was designed to be used. After applying your product either directly to the sponge, back of your hand or even your face pat the product across your face quickly and lightly, don't pull it across your face with harsh strokes- it won't work! Using the repetitive patting motion will provide you with perfectly even coverage and an airbrushed finish.

Good luck using beauty blenders guys, let me know if you have any more tips or tricks for the perfect results from these little miracle sponges!

Until next time, Toni. xo

Beauty blender pictured: Real Techniques Base Sponge 

Wednesday, 27 July 2016

Summer Secret? Setting Spray!


In the UK at the moment we seem to be having the best summer I may have ever witnessed but let's not jinx it! I would like to keep the temperature between 20°- 30° for as long as possible to actually go out and enjoy my days off work and make the most of my summer wardrobe! HOWEVER the biggest problem that this beautiful but very hot weather poses is that my make up literally runs off my face, now obviously I don't wear a full face of make up every day in these high temperatures but when I do I want it to actually stay on...

Well I think I've found the answer, the secret to keeping your make up on so your face doesn't look like a melting panda: Urban Decay's Setting Spray!

Although the setting spray has been available for quite a while now and sat in the back of my make up collection waiting to be used I've only recently picked it up and fell in love with it thanks to this hot weather and my goodness am I glad! The spray I have been using is the 'All Nighter' long lasting formula however there is also a 'De-slick' oil control and 'Chill' cooling and hydrating formula.


The 'All Nighter' spray prevents make up melting, moving into lines or creases and fading promising to last up to 16 hours. When spraying it over your make up to get best results you should spray in and 'X' and 'T' formation, the formula is very light weight but requires a few minutes to dry properly to set you off for your day/night.

I think although the formula alone is very effective for best results I've noticed my make up lasting longer with primer and plenty of setting powder also. This is simply an addition at the very end of my normal make up routine to hold everything in place and fight against the humidity in the hot summer months or nights out.


What are your best tips for keeping your make up in place during summer? Let me know!

Until next time, Toni. xo

Saturday, 9 July 2016

My Top 3 Mascaras


I think its fair to say that without these mascaras I would be lost when it comes to my lashes as these are what I like to call my holy grail products.

On my top lashes I always love to go OTT on the mascara, using several coats to thicken and lengthen every lash. The bottom I keep simple but effective with evenly coated and separated lashes. I never curl my lashes as I'm lucky to have naturally curly hair and lashes but do coat the back and front evenly which I find helps to lengthen and thicken.

On the top: I always go in first with the Soap and Glory Thick and Fast HD Mascara all over the lashes; front and back, several times to build up length and initial volume. I find this mascara an absolute dream to use with a perfectly shaped brush, long wand and smooth consistency. I think this mascara is great on its own and does exactly what it says on the packet but for personal preference I bulk it up with more.
On top of the first few coats of Thick and Fast, while still slightly wet, I go in with the Benefit They're Real! mascara. This is where the volume starts to build! After a few coats on the back and front with this, my lashes are looking long, thick and evenly coated. However, I do find the benefit mascara to be slightly clumpy on the tips of my eye lashes so go back with the thinner brush from the Soap and Glory mascara to separate the lashes to finish. The benefit mascara is very fast drying which I love so I don't smudge or run any of the product.

On the bottom: My bottom lashes are much more simple than the top in that I use one product only and coat the top side. I don't use too much product as my lashes are fairy long and I try to avoid the spider leg-look! For this I use the Nars Audacious Mascara. This mascara comes with the most perfect sized brush for my bottom lashes with small, thin bristles and a short wand which allows me more control. With 2/3 even coats of this mascara on my bottom lashes I'm finally finished and left with long, thick and separated lashes on both top and bottom!

Until next time, Toni. xo

Thursday, 30 June 2016

Garnier Make Up Removal


Garnier has always been one of my favourite lines for skin care with creams and facial scrubs etc. so when I found out they were releasing a new make up remover and cleansing water I had to get my hands on it and give it a go!
 
It's fair to say I now love it and couldn't be without it.
 
The 2-in-1 Eye Make-up Remover product is made up of two parts, one slightly oily and the other a less dense, clear liquid. I've seen some people saying it leaves a greasy residue however I find that comes only if you don't shake the bottle which is the whole idea of the product. By shaking the bottle the two liquids mix and form a non-greasy, efficient and soft make up remover- DREAM!
 
The thing I love most about it is how gentle it is on my eyes. A lot of make up removers sting or irritate the skin around my eyes but as this is specifically designed to remove make up easily and quickly its not exactly 'heavy duty'. Although it removes all make up I wouldn't rely on this on it's own and still use other products to cleanse and tone my skin afterwards.

The Micellar Cleansing Water works wonders for quick and easy make-up removal which means it literally takes me a minute to soak a cotton pad in the formula and wipe the day's face away. Depending on how much make-up you're wearing it may take you a couple of cotton pads worth of the cleanser to remove all make-up and freshen up your face. Again, I don't rely on this as my cleanser and use it more as a make up-remover only, using my trusty No.7 products that you can see [HERE] after these products have done all I need them to.
 
 I have quite sensitive skin and find these products don't irritate or affect it in any way. I also have a 'combination' skin consistency which is neither solely greasy or dry
 but a mixture of both and I think these products work well across my entire face- yay!

These products have not only made my night skin routine 10 times quicker and easier, but also helped to maintain my skin condition keeping acne at bay and helping to increase the hydration level which I find to be a big chore: how bad of me! I would recommend these skin care items to anyone like me who loves make up but hates taking it off at the end of the day and just wants the process to be as quick and easy as possible; however, if you're looking for a 30 minute rejuvenation process these are not for you.

Until next time, Toni. xo


Sunday, 29 November 2015

No7: No Noticeable Difference?


I have always sworn by No.7 products and the brand is normally my safety net for all things beauty. No.7 is actually the brand that started my interest and collection of make up. However, this time I'm not so impressed. A mascara I've been a fan of for as long as it has been on shelves has an extended version and being the lover of No.7 I am, I didn't question to give it a try.

The original mascara claims to offer a waterproof, extreme length effect which I can agree it does, it works wonders on my eye lashes and I'm proud to say I'm a repeat customer. It's extension claims to do that and more, with a 'fibre enriched formula' and new packaging, things looked promising! I have been testing the new and 'improved' version for a few months now and am still yet to see a difference or improvement.


No.7 have let me down on this one: the brush is the same, the product consistency looks the same, applies the same and lasts the same amount of time. Both products are good; both products extend lash length and both products I would recommend. I suppose my only question is what on earth is the difference?

The 'extend' claim is not visible in results on my lashes and as I've read other's reviews after purchasing and testing, the same conclusion comes from many people similar to myself. My advice to any No.7 lovers out there is try not to get too excited if similar extension products are released, wait for reviews before spending unnecessary money on a product you already have in your collection!

Original Mascara: here.

Extend Mascara: here.


Until next time, Toni. xo

Sunday, 22 November 2015

The Perfect Red Lip


http://www.loreal-paris.co.uk/make-up/lip/lip-colour/color-riche-collection-exclusive-pure-reds
 
As party season is just around the corner and Christmas is in sight it's time to pull out the red lippy and with long days shopping and late nights out you need a trusty one to see you through. I have the answer. L'OREAL's 'Color Riche' collection holds some beautiful colours but one of my favourites by far is 'Blake's Pure Red'.
 
The colour is deep and powerful with a matte smooth finish on the lip, this is perfect for any occasion night or day. Matching with Christmas jumpers and dresses, there is every excuse to pull out a bold, bright and beautiful red.

http://www.loreal-paris.co.uk/make-up/lip/lip-colour/color-riche-collection-exclusive-pure-reds
 
Not only is the product itself beautiful to wear and look at, so is the packaging, a matte black animal print touched with gold detailing and print, this is an essential for your make up collection this year. The quality of the product is a steal at only £6.99 from your local drugstore. The level of pigment and staying power is something only dreams are made of and I've never quite had anything like it. The product doesn't bleed off the lip or smudge and loose the shape. It has held strong through all tests of eating, drinking, talking and even heavy rain - you could say it's a super lipstick.
 
This is a must buy for yourself or any fellow make up and lipstick lovers this Christmas with seasonal colours matching the deep red pigment perfectly. This has been my favourite red lipstick I've ever tried and potentially the best lipstick find this year. You simply must try it.

http://www.loreal-paris.co.uk/make-up/lip/lip-colour/color-riche-collection-exclusive-pure-reds
 
Until next time, Toni. xo

Sunday, 15 November 2015

Beautiful Skin: Winter Routine


Usually winter time for my skin is bliss, the cold dries out any impurities and the crisp air keeps me feeling fresh and awake. However, this year my skin hasn't reacted so well to the change in weather conditions. The cold seems to have dried out my skin a little too well leaving me feeling tired and washed out, yet the odd spot still appears! This called for emergency intervention: No.7 came to hand.
 
I have always loved the cleanser but needed something stronger that would really clean off any dead skin cells and make me feel fresh and awake like normal. After looking through the endless product choices at the No.7 stand, I opted for the 'Radiance Exfoliator' from the same 'Beautiful Skin' collection as my usual cleanser.
 
My daily routine (morning and night) consists of 3 steps, wash/rinse face with warm water, cleanse with the No.7 Cleansing Gel and finally gently scrub with the No.7 Radiance Exfoliator. This not only leaves my skin feeling clear, fresh and awake but I have noticed a drastic improvement with the dryness and blemishes.
 
No.7 have yet again provided me with a holy grail skin care product I'm sure to repeat buy and from now on, swear by. If you are looking for a cleanser and exfoliator this winter I would highly recommend both products for anyone with normal/dry skin consistency. If you are in the market for something for oily skin go down to your local No.7 stand as their extensive product range is bound to hold something to solve all your skin related problems this winter! Happy hunting.


http://www.boots.com/en/No7-Beautiful-Skin-Melting-Gel-Cleanser-for-Normal-Dry-Skin-150ml_1245016/ http://www.boots.com/en/No7-Beautiful-Skin-Radiance-Exfoliator-for-Normal-Dry-Skin-75ml_1245022/
 
Until next time, Toni. xo

Sunday, 8 November 2015

Smashbox Contour Sticks Trio


http://www.smashbox.co.uk/product/13595/34191/contour/STEP-BY-STEP-CONTOUR-STICK-TRIO/index.tmpl?77tadunit=b92211fb&77tadvert=50473102532&77tkeyword=smashbox%20contour%20sticks&77tentrytype=s&cm_mmc=ppc-_-77agency-_-brand-_-smashbox%20contour%20sticks&gclid=CjwKEAjwwbyxBRCS74T049iEp0wSJACkO5v1K7pLA5t2XtIPq4Ditk1k7ocK6ymc06CKOaSChSqr_xoCzbzw_wcB

These have been at the top of my must have list for a while now and since opening the box I haven't put the Contour Sticks Trio back! It's clear to say I'm loving these products. They have a smooth and silky, cream texture making them so easy to apply and blend.
 
The box also comes with a sharpener to fit the pencil sticks so worrying about ever being left with an unusable product is not necessary! I had heard some great things about these sticks and wanted to try them as soon as I got my hands on them.
 
I find that the contour stick works best for me with the bronze stick as a touch up for the top of my head. However, the highlight is surprisingly too dark for me but it will be perfect for if I get a tan or want just a tiny touch of highlight on a basic make up day.
 
As well as the sharpener, the trio comes with an instruction sheet including guides on where to apply the different colours and how to use the sticks depending on your face shape and how you want to look. I found this very useful as I was able to see exactly what shapes to draw, where and with which sticks.
 

http://www.smashbox.co.uk/product/13595/34191/contour/STEP-BY-STEP-CONTOUR-STICK-TRIO/index.tmpl?77tadunit=b92211fb&77tadvert=50473102532&77tkeyword=smashbox%20contour%20sticks&77tentrytype=s&cm_mmc=ppc-_-77agency-_-brand-_-smashbox%20contour%20sticks&gclid=CjwKEAjwwbyxBRCS74T049iEp0wSJACkO5v1K7pLA5t2XtIPq4Ditk1k7ocK6ymc06CKOaSChSqr_xoCzbzw_wcB 
 
A lot of people I know and those that use the sticks, blend the product with a flat, buffing brush but I prefer to use a beauty blender purely because I feel like I have more control over the product on my face and the finish is a lot more flawless. Since using the product I've really got into getting a good contour on a night out or even just a bronzed touch on a day-to-day basis for a slightly more defined shape.
 
The product is £35 which I personally think is very reasonable for the quality of product. I've had this product nearly two months now and have used the contour stick every day, I am yet to need to sharpen it more than once! You don't need a lot of product per application as it is so well pigmented and blends so well, therefore the trio will last a long time and probably save you money in the long run in comparison to your usual product that may run down quickly, due to you needing to use a lot of it per day.
 
I would recommend the trio to people who are already into make up and want to explore and venture further into face sculpting as this is quite a complex, heavy product for someone just beginning to get into make up. Alternatively, I would recommend a simple bronzing powder not to irritate or harm the skin and gradually build to using heavier products such as this one. The staying power is fantastic so they can be used day and night, any weather, any occasion to give you the extra pop to your face structure! The hype is totally worth it and I'm so grateful I can finally say I own a set of these heavenly products. You can find the sticks trio here.
 
http://www.smashbox.co.uk/product/13595/34191/contour/STEP-BY-STEP-CONTOUR-STICK-TRIO/index.tmpl?77tadunit=b92211fb&77tadvert=50473102532&77tkeyword=smashbox%20contour%20sticks&77tentrytype=s&cm_mmc=ppc-_-77agency-_-brand-_-smashbox%20contour%20sticks&gclid=CjwKEAjwwbyxBRCS74T049iEp0wSJACkO5v1K7pLA5t2XtIPq4Ditk1k7ocK6ymc06CKOaSChSqr_xoCzbzw_wcB
 
Until next time, Toni. xo

Saturday, 19 September 2015

My Top 3 Drugstore Foundations

 
I've always stuck to No7 foundation throughout my make up loving years however a few weeks ago I decided to give a selection of drugstore foundations a go to see if going for slightly cheaper alternatives made much of a difference. Turns out a few of these foundations actually work wonders on my skin so I've picked my top 3 from those I purchased to talk about.
 

http://www.boots.com/en/LOreal-Paris-True-Match-Foundation_16049/
 
This is the lightest foundation of all 3 but provides a great, even coverage. The pigmentation isn't amazing but the texture and easy application makes it perfect for those confident days when you're skin is looking fresh and clear. I've been using this a lot throughout the summer because it allows your skin to breathe without moving or streaking on your face. The colour I have this foundation in is 'Ivory' which I've found is a great colour match for me. The foundation also has an SPF of 17 which is perfect for me! This foundation ticks all the boxes for a light, even and breathable foundation: providing what feels like a new top layer of skin that stays throughout the day without caking or slipping. It is also only £9.99 which is a great price for just how great this product looks and feels on the skin.
 
http://www.boots.com/en/Max-Factor-Face-Finity-All-Day-Flawless-3-in-1-Foundation_1279334/
 
This foundation is the smoothest foundation I've ever used! It is titled to be 'Primer, Concealer and Foundation in one' which I can absolutely believe, when putting it on it glides onto my skin as if I have a base of primer and covers the darker areas or blemishes on my skin perfectly. I purchased this foundation in the colour 'Beige 55'. This foundation would be perfect as a first foundation for people just getting into make up; the consistency is smooth yet buildable but not cakey or drying. This foundation offers a high SPF of 20 which is unusual with a lot of drug store foundations. This foundation is a great quality product for a fantastic price of £12.99.

http://www.boots.com/en/Rimmel-Wake-Me-Up-Make-Up-Foundation-30ml_1246748/
 
 My favourite out of three has got to be this one: everything about it ticks all my personal boxes! The colour, coverage, staying power, breathability, SPF and even the smell! My colour is 010 Porcelain and I honestly cannot get enough of it! This foundation brightens my skin, covers all my dark circles and imperfections but isn't heavy or cakey. I feel like this is the only foundation of the three I can feel going onto my face but after a light powdering you can't feel it on your skin. I would recommend this foundation to anyone and at only £8.99 its a bargain!

 
Until next time, Toni. xo

Saturday, 12 September 2015

Another Bourjois Lipstick Love Affair


If you have seen my recent post [here] about my Bourjois discovery and new favourite lipstick, you will notice I have found yet another loveable lipstick from the Bourjois 'Rouge Edition' range in a much more toned down, yet equally as beautiful colour! This new shade is the colour '02 / Beige Trench'. I purchased this as I felt the softer nude tones with hints of peach throughout would be very flattering against my skin tone to live out the final few weeks of summer and possibly for an understated make up look when I go back to college.  


'18' Alongside '02'
 
The lipstick has a slightly smoother and silky finish meaning I find application a lot easier and quicker than the previous shade '18'. This lipstick works very well with Mac's 'Whirl' lipliner as a base but also a simple, slighlty darker nude outline. Staying power isn't perfect on this lipstick due to the softer finish however, I find it quite a hydrating lip stick making it perfect for all seasons!
The colour is buildable making it wearable for near enough anyone being able to adapt to all looks.
 
I've found myself wearing this lipstick with a slight pink/gold eye shadow and soft blush on the apples of my cheeks. I am planning to try it with a dark smokey eye and defined bronzer contour very soon as I am interested to see how adaptable this colour really is!


Until next time, Toni. xo


Saturday, 5 September 2015

Glossybox: 3 Month Subscription Review


http://www.glossybox.co.uk/

Glossybox is an online beauty subscription box that has been going for many years - I discovered the subscription service through instagram when a sponsored avertisement popped up on my feed - I was instantly intruiged as I had never thought to sign up to a service like this one. I realised this was a great way for me to try new and different products I may otherwise never have the opportunity to.

After looking on the Glossybox website [here] I opted for the 3 month plan where you pay a set amount and get boxes for 3 months - if you like the service after 3 months the service continues in the same way with payments being taken quarterly (you can opt out at any time). There are other payment plans including monthly, half yearly and annually.
The less often you pay the cheaper it becomes!

Monthly = £10
3 Month = £9.50
6 Month = £9
12 Month = £8.50
 
 
My first subscription box was for June and arrived very quickly! I will be totally honest in saying I was slightly disspointed with this box as none of the products were make up and I'm not a lover of nail varnish. However, the actual contents of the box were good quality and worth a lot more than what I paid for my month's subscription.
 
Each month Glossybox selects a number of products from different companies across the world, ranging in price and what you get in your particular box is the luck of the draw. I know in June there was also an Essence Lipgloss I would have liked to try but my box just so happened to contain the nail varnish.
 
Out of this box I have only so far used the wipes and the body mist. I've found the wipes very gentle on the skin and the fact they're non fragranced means that sensitive skin isn't irritated! The pack is also a very handy size making it perfect for festivals along with the gold and black body tattoos. The body mist's handy bottle size is great for the bottom of your bag when you're skin is having a bad day and needs a pick me up. I've found the oil based product is a great, deeply moisturing spray that leaves your skin non-sticky and feeling refreshed. As the product is very oil based I would reccomend it only for people with dry/normal skin textures as oily skin would see no benefit.
 
 
July saw a collector's edition, French inspired Glossybox that focused on skin care! This box was very exciting to open as the packaging was completely different and I didn't know what to expect. I love the care that goes into the boxes as the products are layered with shreded tissue paper and wrapped with a sheet of tissue paper. This paper is usually black and baby pink topped off with a black ribbon bow and Glossybox logo sticker.
The July box cleverly used French flag colours throughout the box including the tissue paper, ribbon and Glossybox sticker. It is small touches like this that made me love the Glossybox packaging as I imagined each box personally put together by hand and sent off to each subscriber - giving the worldwide service a very personal touch.
 
 
When it comes to the products I was very happy with the contents as each product was amazing quality and great size. The difference with this box was that one of the products was actually a make up bag/travel pouch which I've been loving for transporting my brushes away from home! My favourite product from the box was: The Lollipop's Lip Balm. This box also had several products that you may or may not get due to luck of the draw but after looking over the other possible products on the site I was over the moon with the product selection I was sent.
 
The Lipbalm glides onto the lips effortlessly and leaves a perfect shine on the surface with long staying power and a perfect hydration impact. This is actually a product I've nearly finished and will be looking to find and repurchase as soon as I have emptied the tube. I would reccomend this product to literally anyone, I've luckily never suffered badly with dry lips but find this product locks in the natural hydration my lips have. If you have dry lips this will provide the perfect sollution to stop your lips feeling chapped or sore. Even over the top of your favourite lipstick, on a no make up day or just to give your lips a little added extra with soft makeup, this works perfectly.
 
 
August's box was back to normal packaging but the product content blew every other box I had recieved out the water! This box had set products with every subscriber recieving the same contents, I can honestly say I love every single product and they are all being used regularly within my make up and skin care collections. I struggle to pick a favoruite product from the August box as each of them have become go-to products in the recent month! However the product I have been using religiously every day is the Naobay Toner, not only have I used this to remove any make up that may be left after cleansing but also on non make up days to give my face a refreshing and hydrating boost. The bottle size is very generous and will last a while, however I know I will buying more before I run down this bottle to ensure I don't go a day without it. This product is good for all skin types and is very delicate on the skin not to irritate any sensitive areas.
 
 
I will now change my subscription to annual payments to save money and revieve boxes until my heart desires! I would reccomend this service or any similar ones to anyone wanting to try new products regularly and for an extreamly reasonable price as this service brings high end and sometimes holy grail products straight to your door offering a personal, fast and top quality service!
 
 
Until next time, Toni. xo

Saturday, 29 August 2015

Bourjois Buys


Bourjois is an unfamiliar high street brand to me and to be honest I've always just walked past the stand whenever I've been in a drugstore. However, a few weeks back my friend introduced me to one of their lipsticks which I ended up going out to buy just days later!


The lipstick was from the 'Rouge Edition' range and was in the colour '18/Violine Strass'. I actually saw the product in my friend's make up bag and was drawn to the packaging, but I was instantly put off by the deep colouring with purple undertones. I've never been brave when it comes to my lip colour and often stick to nudes or understated pinks so this was a big jump for me to take. However, my friend encouraged (basically forced) me to try it and my goodness am I glad she did! 

Although not at all similar to my usual picks and far from my comfort zone; I loved how it felt and looked on my lips and I suddenly found my comfort zone expanding to make room for this unexpected, new love for colour. The lipstick has a matte, yet slightly smoother finish (making it easy to smudge and move around throughout the day) so I find it best to wear with a base of lip liner or even powder to set it in place. 

As the colour is fairly dark I'm saving it for autumn and winter seasons: my favourite time of year! I'm already excited to pair this colour to dark and warm clothing colours and textures as well as big chunky knit wear. 


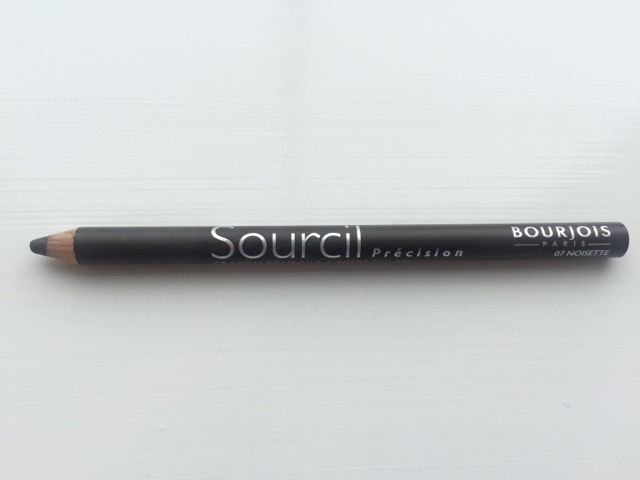
  Onto eyebrows now which aren't really a big priority for me, and up until a few years ago I did nothing with them! Now, I fill them in lightly and just keep them neat, so as I was already at the Bourjois stand something I also picked up was the Bourjois 'Sourcil Precision' eyebrow pencil in the colour '07 Noisette'. 


I have mixed feelings about this pencil, although the colour is a well matched, build-able and easily applied product the lasting power isn't the best. I find that half way through the day it has faded and even smudged sometimes. 

I am going to continue using the product and using it alone, as well as along side my previous favourites, however I don't think I will repurchase and will continue my search for the best eyebrow pencil for me. 

Be brave with make up choices and try things you never normally would - you never know, your comfort zone may change - you might even learn a thing or two about different undiscovered products! 

Until next time, Toni. xo

Thursday, 2 July 2015

Current Favourite Lip Combo.

I've been reaching for these same two Mac products ever since I've bought them and I'm so glad I did.


I would reccomend this lipstick to anyone looking for a slightly deeper nude tone however, after reading a lot of other reviews a lot of people have had problems with the shading against their skin tone and found it's left a grey undertone to the skin's colouring. So when I went in and found the lipstick, I tested it out first on my hand and made sure to check it under different lights to check it complimented my complexion- turns out I'm one of the lucky ones who can wear this tone! 


I asked a friend who I was with about lip liners and if she could suggest any good matches for Velvet Teddy, as I wasn't having much luck finding one to match close enough to what I wanted - she reccomended 'Whirl' as it's one she had seen paired with this lipstick before and sure enough as soon as I tested it against the lipstick it was perfect! 


Ever since purchasing the products I haven't been able to keep them out of every make up look I've done - some how they seem to go with anything and everything - including a darker smokey eye or even a slight pink natural lid!

Thank you Mac and well done on some of the best lip products I've ever used. 


Until next time, Toni. xo